Search This Blog

14 October 2013

Leftover Egg White Ideas and Macaroon Redux

I have a friend who told me that she was working on a spreadsheet that shows which recipes have only egg whites or yolks, and how many of each, so that it would be easy to plan ways to make lots of awesome stuff without wasting half an egg. Good idea, right? I'm inspired to label blog posts in this way, maybe it will be easy to find egg white/egg yolk companion recipes.

After making the lovely tiramisu which uses 4 egg yolks and no egg whites, and not wanting to just throw away the egg whites, I brainstormed ways to use them all:

-Make an egg white omelet
-Make 2 more batches of tiramisu, and use the 12 leftover egg whites for angel food cake
-Use in pancakes/waffles instead of whole eggs
-Make macaroons --> the winner!

If you have any more ideas, please share in the comments :)

I doubled my macaroon recipe, and I thought I would re-do the recipe for you with better instructions, but no pictures.


Macaroons
3 c. unsweetened coconut
1 c. finely chopped almonds
1 c. sugar
4 egg whites

Preheat oven to 350. Grease a cookie sheet. 

Chop up the coconut finely - I do this in my awesome spice grinder about 1 cup at a time; it just takes a couple seconds and I shake the grinder while it works to get everything ground evenly, but not turned it into powder. Place the chopped coconut, finely chopped almonds and sugar in a bowl, mix all together. Add egg whites, mix well. This last time I made the cookies, I beat the egg whites for a couple minutes until they were frothy before adding them, and it was easier to mix them evenly into the dry ingredients, and I think it gave the finished cookies a better texture.

Scoop small balls of the mixture onto the prepared cookie sheet, only about 2 tablespoons per cookie, or use a small ice cream/cookie scoop things for easy evenly sized cookies. Bake for about 10 minutes, them set on the pan for a couple of minutes, then scoop them off and let them cool on a rack.

These cookies will not spread out, you can place them very close together on the pan and they will not grow into each other. I fit this whole (double-)batch onto one cookie sheet. 


04 October 2013

Tiramisu for Mormons

While the government is shut down, Lovemuffin is home, video gaming, catching up on dental work, and watching Downton Abbey (but you didn't hear that last one from me). I suggested that he make this treat for me to come home to after my long day of work (someone's got to bring home the vegi-bacon), it's called Sinfully Sinless Tiramisu and it has no coffee or rum in it. (No judgment if you go for the Tiramisu with rum and coffee - everyone is welcome here :) )

I saw it first on my friend's blog, and the original recipe is here, You'll have to click over to one of those links for the recipe, it's too many steps for me to write it all out for you. But don't be put off by the many steps and components. It was pretty easy for us to do it, and we even made it together, which usually is more difficult. (Lovemuffin thinks I'm bossy when I want him to cook with me, and doesn't like that. What?!?)

Instead of copying the whole recipe for you I "documented" the process.

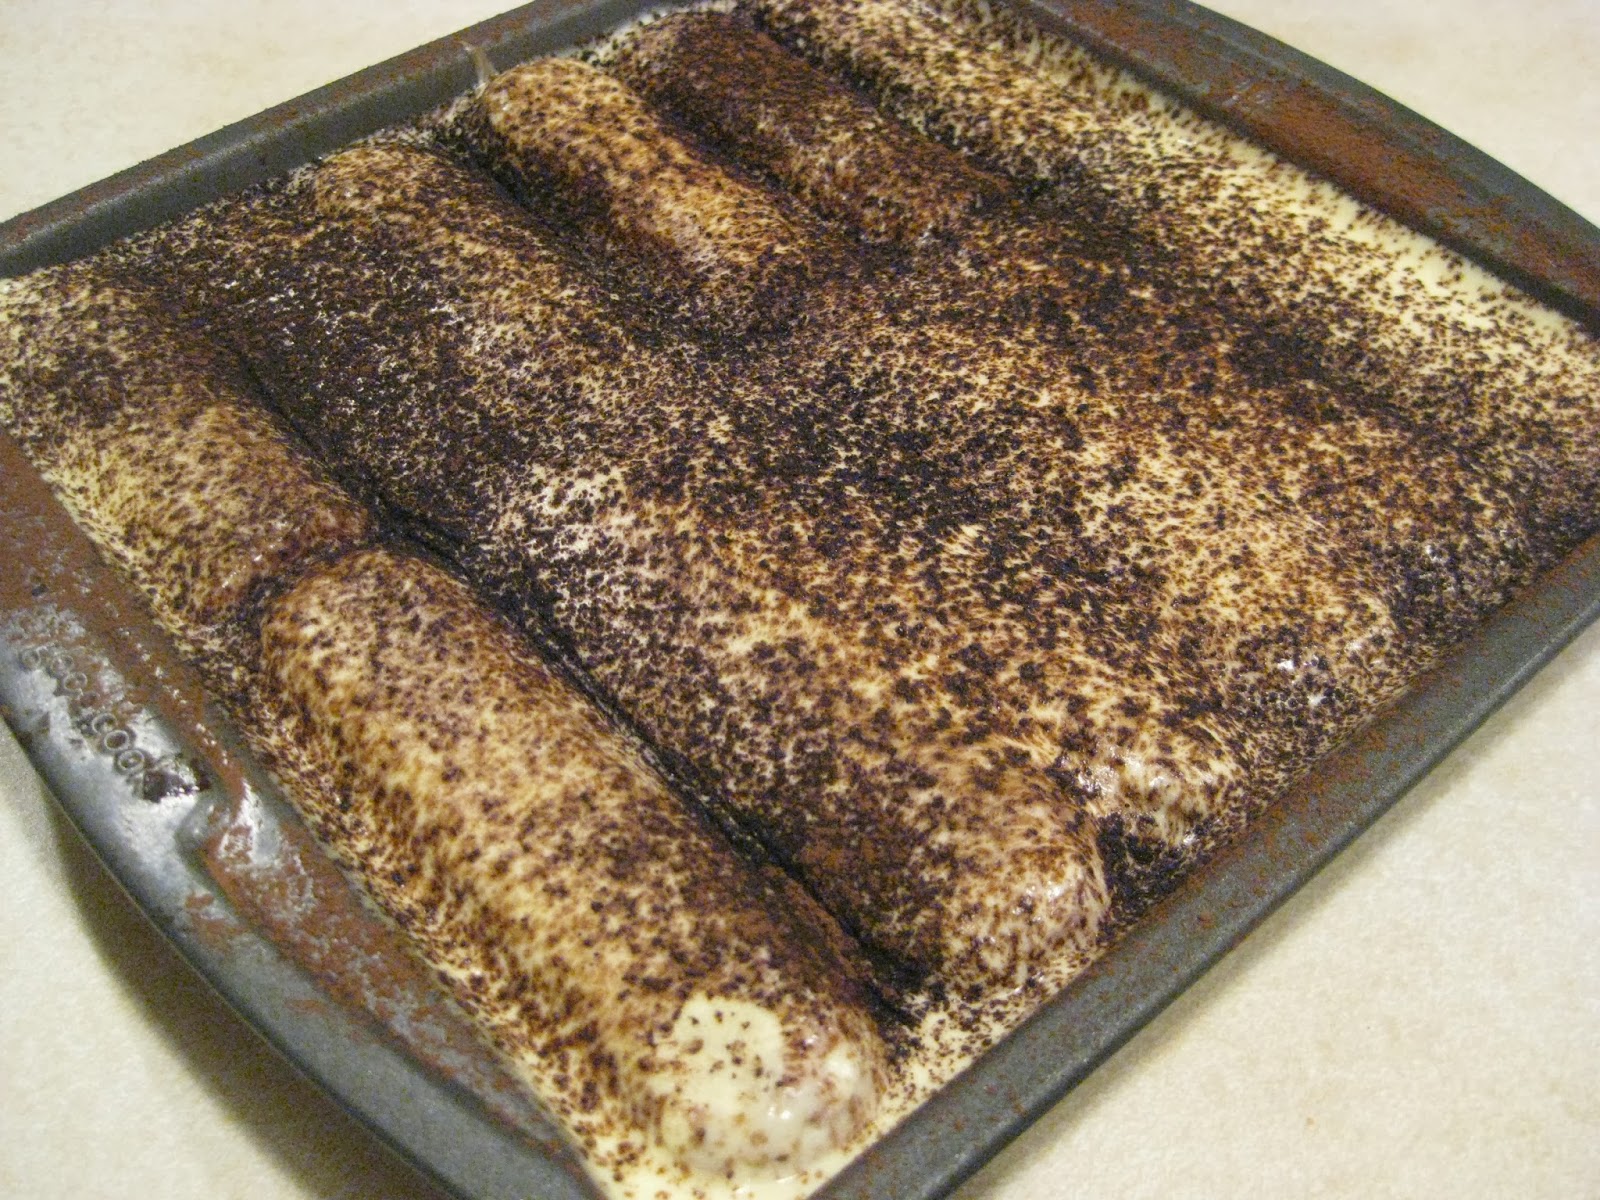
Lovemuffin dipped the ladyfingers in the chocolate mix and arranged in the pan (and looked super serious the whole time).


I made the custard part. I've never made a real custard from scratch over the stove before. Here are my Special Instructions for other custard first-timers: read and follow the instructions, re-read as needed, and google search for descriptions and images of "custard back of spoon" for more insights to help you know when it's done.

We forgot to document the whipping of the cream, the mixing together of the custard and the mascarpone cheese and then the whipped cream, the layering construction and sprinkling of cocoa powder, you'll have to use your imagination. But here is the finished product after chilling in the fridge, ready for (Mormon) consumption!


This was amazing, so delicious, super rich and decadent. It is definitely going to become part of my repertoire.  

A couple more notes: 

1) Someone (not me) really likes the rum flavor, so he doubled the rum extract, I thought that was too much, but it wasn't terrible or inedible, just more rummy than I like. I also would have been happy with just vanilla extract added. The hazards of cooking with others.

2) At first Lovemuffin was afraid that he had soaked the ladyfinger cookies too long, so he took out the extra saturated ones and replaced them (I suspect he mostly wanted to taste test the soaked cookies), but when we cut into it the cookies were pretty crunchy still, next time we will probably soak them for longer. But I imagine that the further in advance you make the Tiramisu, the more moisture the cookies can soak up, so that's something to take into account. I'll have to test this theory tomorrow at breakfast. Haha! 
*edit* After eating this dessert all weekend, I recommend that if you are making it ahead of time, give yourself enough time to let it chill/set up overnight, closer to 12 hours. The custard/mascarpone will set up more and hold the pieces together, instead of what you see in our pictures, where all the cookie parts are falling apart and the custard is oozing everywhere. And I was right, the ladyfingers will get properly softened after a longer chill time. But if you just CAN'T WAIT extra time to dig in, it of course tastes just as good after a short 4 hour set-up time. 

Bonus points to anyone who can tell me what is up with these faces I'm making here. Lovemuffin sure knows how to catch me at my best. (Oh yeah, and check out my shirt, I made that shirt, you should see the stripe matching! BAM!) (Also, bonus points for me for the number of parentheses used in this post.)


11 August 2013

Another Summer Salad

I recently rediscovered a fancy pumpkin seed oil and quince balsamic vinegar set that was given to me a while ago, the bottles were hiding in the outside fridge, lonely and forgotten. I read something online about eating pumpkin seed oil with heirloom tomatoes, and it sparked a memory -- I have pumpkin seed oil! It was very exciting. So this is the salad that I made:

About 3 large tomatoes, diced
2 small-medium sized cucumbers, diced
a few basil leaves, chopped
1 can of small white beans, drained and rinsed well
drizzle of pumpkin seed oil, to taste
drizzle of quince balsamic vinegar, to taste
sprinkle of salt

Combine everything in a bowl, toss it all together, and eat.

We ate this with corn on the cob for a light dinner. No pictures - our camera has been missing for 2 weeks. It will turn up, but prepare yourself for some more picture-less posts, I actually have things to share.

Also, thank you, Laura, for your comment, it's always nice to see that I still have readers, even after a long break between posts. :)

21 July 2013

2 Summer Salads

Happy Summer!

Wow, I haven't posted for a long time. So, dear readers, to make up for that (because I know your life revolves around this blog), I have 2 recipes - double whammy!

They are barely recipes, and I can't take credit for inventing either of them, but I have pictures (but only of one of them).


The first is basically caprese salad.

Here's what you do:
Cut up some tomatoes (fresh from the garden), cut up some mozzarella from the grocery store, chiffonade those fresh basil leaves (also growing in the garden), sprinkle with olive oil and maybe a little salt.


Eat outside with your lovemuffin.


The second salad is something that we got at a tapas place in DC called Pulpo, it doesn't look like it's on their menu anymore, so I don't know what they called it. It probably deserves a name other than a list of its ingredients, any suggestions?

Cut up some:
Watermelon (I did about 1/4 of a largish melon)
Cucumber (I used 1 regular cuke)
Soft mild cheese, I used mozzarella cheese, but at Pulpo it was made with soft fresh goat cheese - much better, too bad some people who eat my food don't like goat cheese
Dill (I just kept adding till it looked and smelled good, probably a couple of teaspoons)

Stir it all together and eat it cold. Surprise! Dill and goat cheese are really good with watermelon. Sorry there's no pictures, the leftovers this morning were pretty sad looking, but still delicious.


16 February 2013

Kitchen Science: Defying Gravity!


The other day I found this amazing thing in the freezer, a stalagmite of ice! I guess it happened because of the way water expands when it freezes, but I don't know why it would make such a distinct formation like this. Any ideas?


14 February 2013

Hazelnut+Chocolate=Love Cookies

I bought hazelnuts recently, with the idea that I would make a nut torte recipe that I've been eyeing for years. But instead I made these cookies, which turned out pretty amazingly considering how experimental and not-following-a-recipe they are. In fact, Lovemuffin said at one point, "These are the best cookies I've ever had." So there you go. I started out using this recipe, but after making a silly mistake and also realizing I didn't have any eggs, I did some math and switched to this recipe from Martha Stewart, but you can see my final recipe is very different then hers.


Hazelnut+Chocolate=Love Cookies (makes about 3 1/2 dozen cookies)

2 cubes butter, softened
1 1/4 cups white sugar
pinch salt
1 1/2 cups hazelnuts, toasted, skins removed* and ground** -- if my math is correct this made about 2 1/2 cups of hazelnut flour
1 7/8 cups all purpose flour
1 cup dark chocolate chips
about 1/4 cup milk

Cream together the butter and sugar until nice and fluffy. Add the salt and ground hazelnuts, mix a little, then add the flour and mix more thoroughly, then add the chocolate chips. I chopped up my chocolate chips even smaller in my nifty spice/coffee grinder because I didn't want big chunks, but I didn't want very fine cocoa powder. After mixing all of these things together, your dough shouldn't look like dough at this point, it should be fluffy and crumbly, but not holding together. Add a little of the milk and mix, continue until the dough turns into regular looking dough and holds together, you might need a little more or a little less milk than 1/4 cup.

At this point you can chill the dough until you need it. In fact, I would recommend chilling it for a few minutes to help the butter harden, since that's the only leavening action these cookies will have, so chilling will help them be fluffy and hopefully they won't spread out like pancakes.

Scoop out spoonfuls of dough and place on a greased cookie sheet, squish gently with the tines of a fork. Bake at 350 degrees for about 15 minutes. I cooked mine for longer because they seemed really soft still, but then later when completely cool they were very crunchy, so how long you cook it depends on how crunchy you want your cookies. Remove from pan and let cool. I recommend you eat these dunked in milk or your favorite warm beverage.

* A word about hazelnuts: getting the skins off and grinding these suckers was the most time consuming, tedious cooking job I have done for a long, long time. Every recipe that gives directions says to just toast the nuts about 6 minutes, then rub off the skins with a kitchen towel, and voila, that's supposed to do it. But I spent way too much time on this part because most of the skins did not want to come off. I toasted the very stubborn-skinned nuts a second time, and it might have helped, but I gave up on trying to get all the skins off of every nut. And the cookies were still great, so no pressure to do a perfect job at that. 

**I ground the nuts in a small smoothie blender thing in batches. It probably helps to have them in a small blender area so they are continually being redirected into the blades, and even then I had to keep shaking the container to try to get it to work better. When a batch of nuts seemed ground up all the way, I would put it through a sieve into a bowl, to catch all the extra large unground pieces, then put those large pieces back into the blender with the next batch.


This is the very first draft of this recipe, and just like all my recipes and pretty much every recipe in the universe (that my be an exaggeration) it is open to modifications, it may be possible to improve it even more. 
Some ideas that I had were: 
-use an egg, beat it with the butter/sugar, and omit the milk
-add your favorite spices, like cinnamon, cardamom, orange peel, etc. 
-use cocoa powder instead of chocolate chips
-decrease the amount of butter and label them "healthy," maybe even use whole wheat pastry flour instead of all purpose
-leave some of the hazelnuts in larger pieces for some extra crunch
-omit the chocolate chips, and then when the cookies are baked, make them into sandwich cookies with Nutella or chocolate ganache as the filling.
And if you need to make these ahead of time, you could easily form the balls of dough and then freeze them for later.


28 January 2013

Kitchen Science: Delicious!


Even though I poured the honey on top of the oil, it fell to the bottom of the container because honey has more mass than oil; and water would fall exactly in between honey and oil. Amazing! And it makes delicious granola.

07 January 2013

Best Pumpkin Pie

Ellen says it's the best she's had, and pumpkin is her favorite kind of pie. It is based on the recipe on the back of the Libby's can of pumpkin, adjusted for what we had at home and other recipe ideas that we saw around the interwebs and recipe books at home. You can always play with spice amounts and combinations; I usually figure that you can add more spices to almost anything that it calls for in the recipe. I didn't take any pictures, but you can imagine what it looks like because it pretty much looked like any other pumpkin pie.

Best Pumpkin Pie 
1 single unbaked pie crust
filling:
1 15 oz can pumpkin puree
1 12 oz can sweetened condensed milk
3 eggs
1/3 cup brown sugar
1 1/2 teaspoons cinnamon
1 teaspoon ground ginger
1/4 teaspoon nutmeg
1/4 teaspoon cloves
1/4 teaspoon ground cardamom
1/4 teaspoon salt

Preheat oven to 450 F.

Place crust in a pie pan, fold under the edges and crimp. Keep crust cold in the fridge or freezer until until ready to bake pie

Mix together all filling ingredients thoroughly.

Pour filling into pie shell, bake at 450 for 10 minutes, decrease temperature to 350 for an additional 50 minutes, more or less. I could tell it was done but not overdone because the filling still jiggled a little bit, but didn't look at all liquid, it was puffy and developing smallish cracks on the sides next to the crust, and the bottom of the crust was a lovely golden brown as well as the exposed edges.

Let cool completely in the refrigerator before serving with freshly whipped cream. Store remainders in refrigerator if you have any.